DTN builds, hosts, and maintains your website on an enterprise grade platform. Once your site is live, you may be granted access to update approved content while DTN continues to manage the site structure, integrations, security, and hosting.
This article explains how to log in and make content updates safely and correctly.
Before You Begin
DTN builds, hosts, and maintains your website on an enterprise grade platform. You may be granted access to update approved content while DTN continues to manage the site structure, integrations, security, and hosting.
What You Can Update
You may update the following approved content areas:
• Page content and headings
• Images in approved areas
• Buttons and links
• Staff bios
• Contact details
• PDFs and downloadable documents
What DTN Manages
DTN continues to manage the following items:
• Site structure, layout, and templates
• Navigation and menus
• Widgets and integrations such as cash bids, futures, maps, and feeds
• Performance, security, backups, and hosting
Requests for new sections, layout changes, or additional functionality should be directed to DTN Support.
Step 1: Accept Your Access Invitation
- Watch for an email invitation from DTN.
- Select the link in the email.
- Set your password.
- Complete two factor authentication using SMS or email.
Once completed, you will be able to log in to your website.
Step 2: Log In to Your Website
- Go to your website in a browser.
- Add /wp-admin to the end of the website address.
Example: https://yourwebsite.com/wp-admin - Enter your username and password.
- Select Log In.
Step 3: Open the Page You Want to Update
- In the admin menu, select Pages.
- Choose All Pages.
- Select the page you want to edit, such as Home, About, or Locations.
Step 4: Update Approved Page Content
You may edit content directly within the page editor, including text, images, links, and documents located within approved sections. Only edit areas that are clearly editable to ensure site performance and consistency.
Step 5: Edit Page Content and Images
Edit Text Blocks
- Select the text block you want to edit.
- Update the text directly in the editor.
- Save your changes using Update in the top right corner.
To view all blocks on the page, select the three horizontal lines in the top left of the editor.
Update Images
- Select the image block you want to change.
- Drag and drop a new image to replace the existing image
or - Select Replace to upload a new image.
Step 6: Add New Blocks or Groups (When Permitted)
- Select the group where you want to add content.
- Select the three vertical dots above the block.
- Choose Add before or Add after.
- Select the block type you want to insert.
To add columns:
- Type /columns.
- Select the number and layout of columns.
- Add content blocks inside each column.
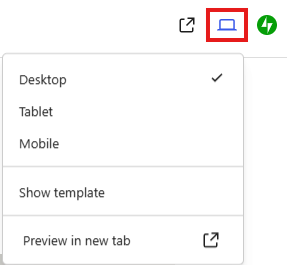
Step 7: Preview Your Changes
- Click the View icon to preview the page. Choose whether you’d like to view it in Desktop, Tablet, or Mobile format, then click Preview in new tab.
- Review your updates carefully.
- Whenever possible, check both desktop and mobile views to ensure everything displays correctly.
Step 8: Publish Your Changes
- Select Update in the top right corner.
- Your changes are published immediately.